Coffee Table

image

Decorating. Design. Deals! T.W.O. has been having a great time finding some great items for their home decorating project! This past weekend, we stumbled upon some fabulous items for our coffee table. The color scheme throughout our house is neutrals with some blue accent pieces. Most of our beautiful wood furniture (coffee table, media chest, dinner room table) are all on the darker side, so we needed to tie in some neutral accessories. To do so, we made our merry way down to HomeGoods and bought these wonderful tabletop pieces! We left the store with some lovely treasures – without emptying our wallets!

image image image image

Thank you HomeGoods!

T.W.O. signature

Pear & Almond Galette

image

Galette’s are a quick and easy alternative to making a pie or tart. It doesn’t require a special pan or master technic. Check out how to make this pear & almond galette.

Ingredients

*Flaky Crust:

-2 cups flour
-¾ cup shortening (T.W.O. uses butter flavor)
– 2-3 Tablespoons sugar
– 5-6 Tablespoons cold water
-1 egg white
*Please note this recipe usually makes two pie crusts, so adjust accordingly based on the size you want your galette

Filling:

– 7 ounces almond paste
– 5 Comice Pears, peeled & sliced
– ¼ cup granulated sugar
– 2 Tablespoons cinnamon
– 2 Tablespoons nutmeg
– 2 Tablespoons cornstarch

image

Preheat oven to 425ᴼF. In a bowl mix the flour, shortening, sugar and cold water. T.W.O. uses a pastry blender to mix the dough together until you form it into a ball. Set aside.

In a bowl, carefully mix the sliced pears, sugar, cinnamon, nutmeg and cornstarch. Be careful not to break the pears while mixing.

image

To roll out the dough, make sure your surface is floured so that the dough doesn’t stick to your countertop or mat. Using your rolling pin, roll the dough out evenly in a circular shape. With the assistance of a spatula, move the rolled out dough into the oiled or “PAM’ed” baking pan or cookie sheet. Next, add the almond paste to the center of the dough. You want to make sure the clumps of paste are distributed evenly, leaving a 1 inch border around the edge of the circle. Next add the pear mixture on top of the almond paste.

Using a knife, cut ½ thick strips along the edge of the dough. Next, take each strip and fold over to make a crust. Each strip should be crisscross. Brush the crust with the egg white and sprinkle sugar on top.

image image

Bake the galette for about 35 minutes or until the fruit mixture is bubbling. Check the crust at 15 minutes and if the pie crust is getting brown, cover with foil. Remove the galette and let it sit for 15 minutes before serving. If you don’t plan to eat the galette right away, T.W.O. suggests warming it up prior to eating. Add a scoop of ice cream and you have yourself a gourmet dessert!!!

image image image

Happy Baking!!

T.W.O. signature

Gruyere Popovers

image

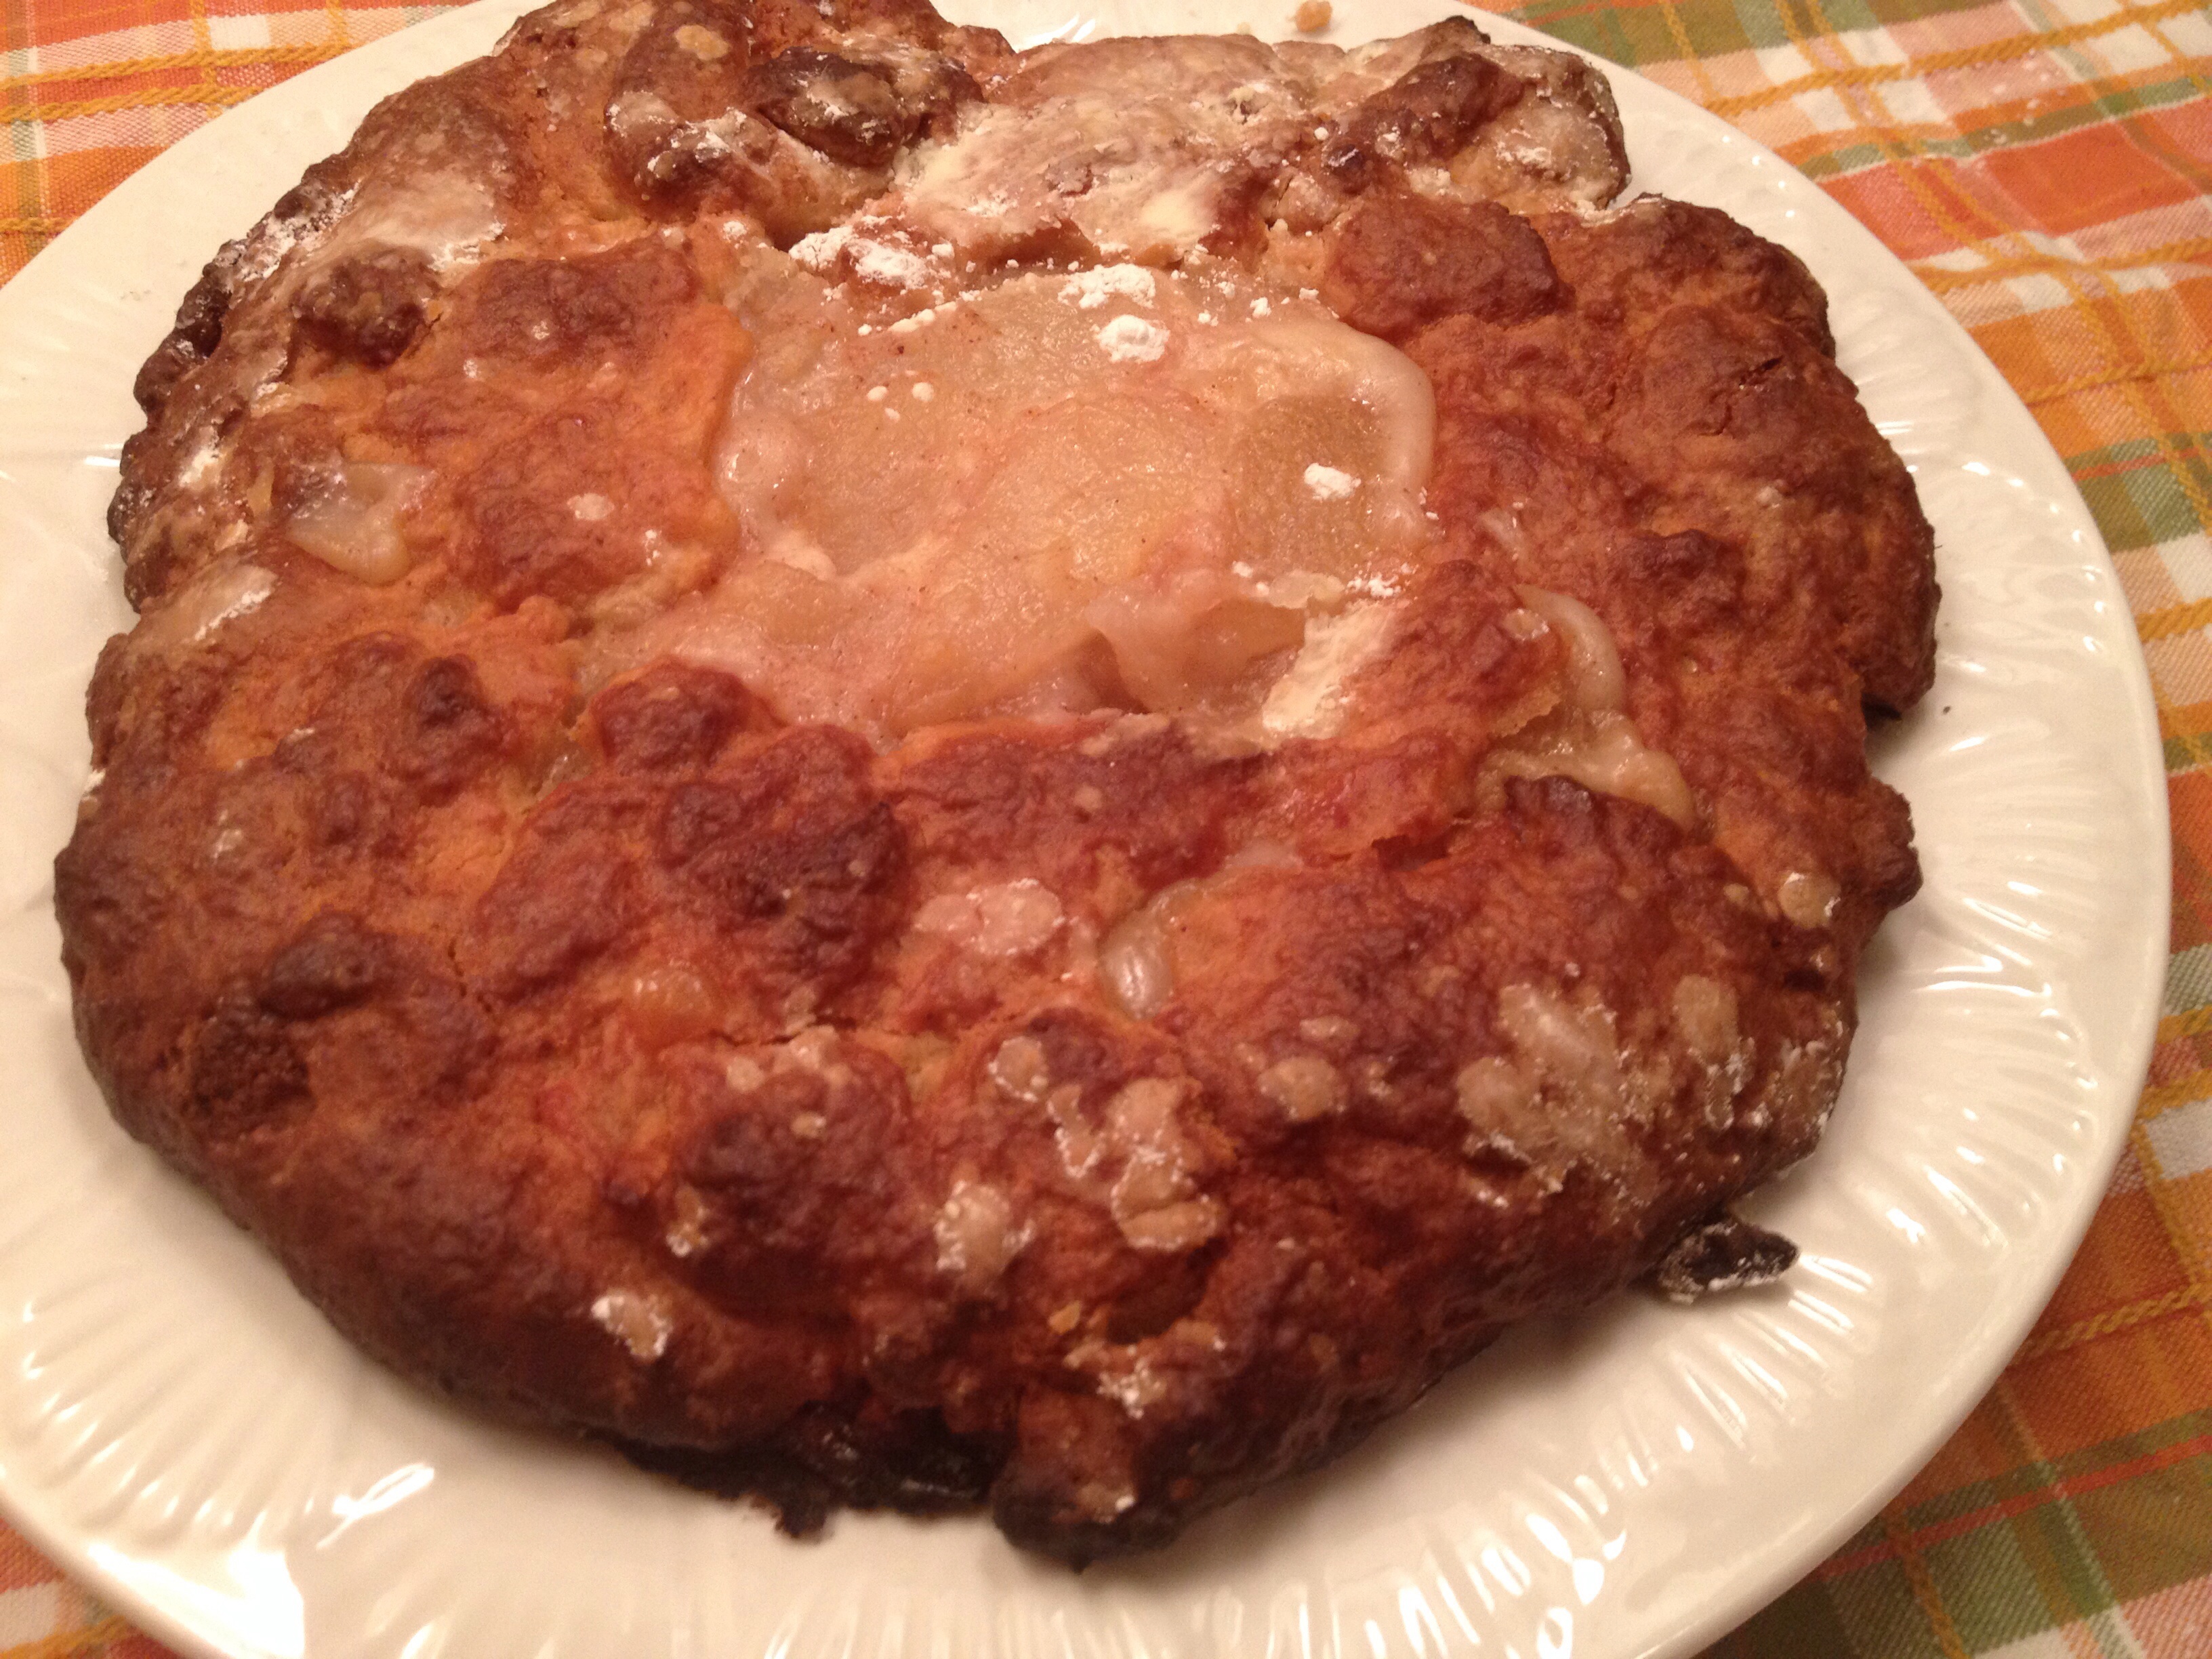
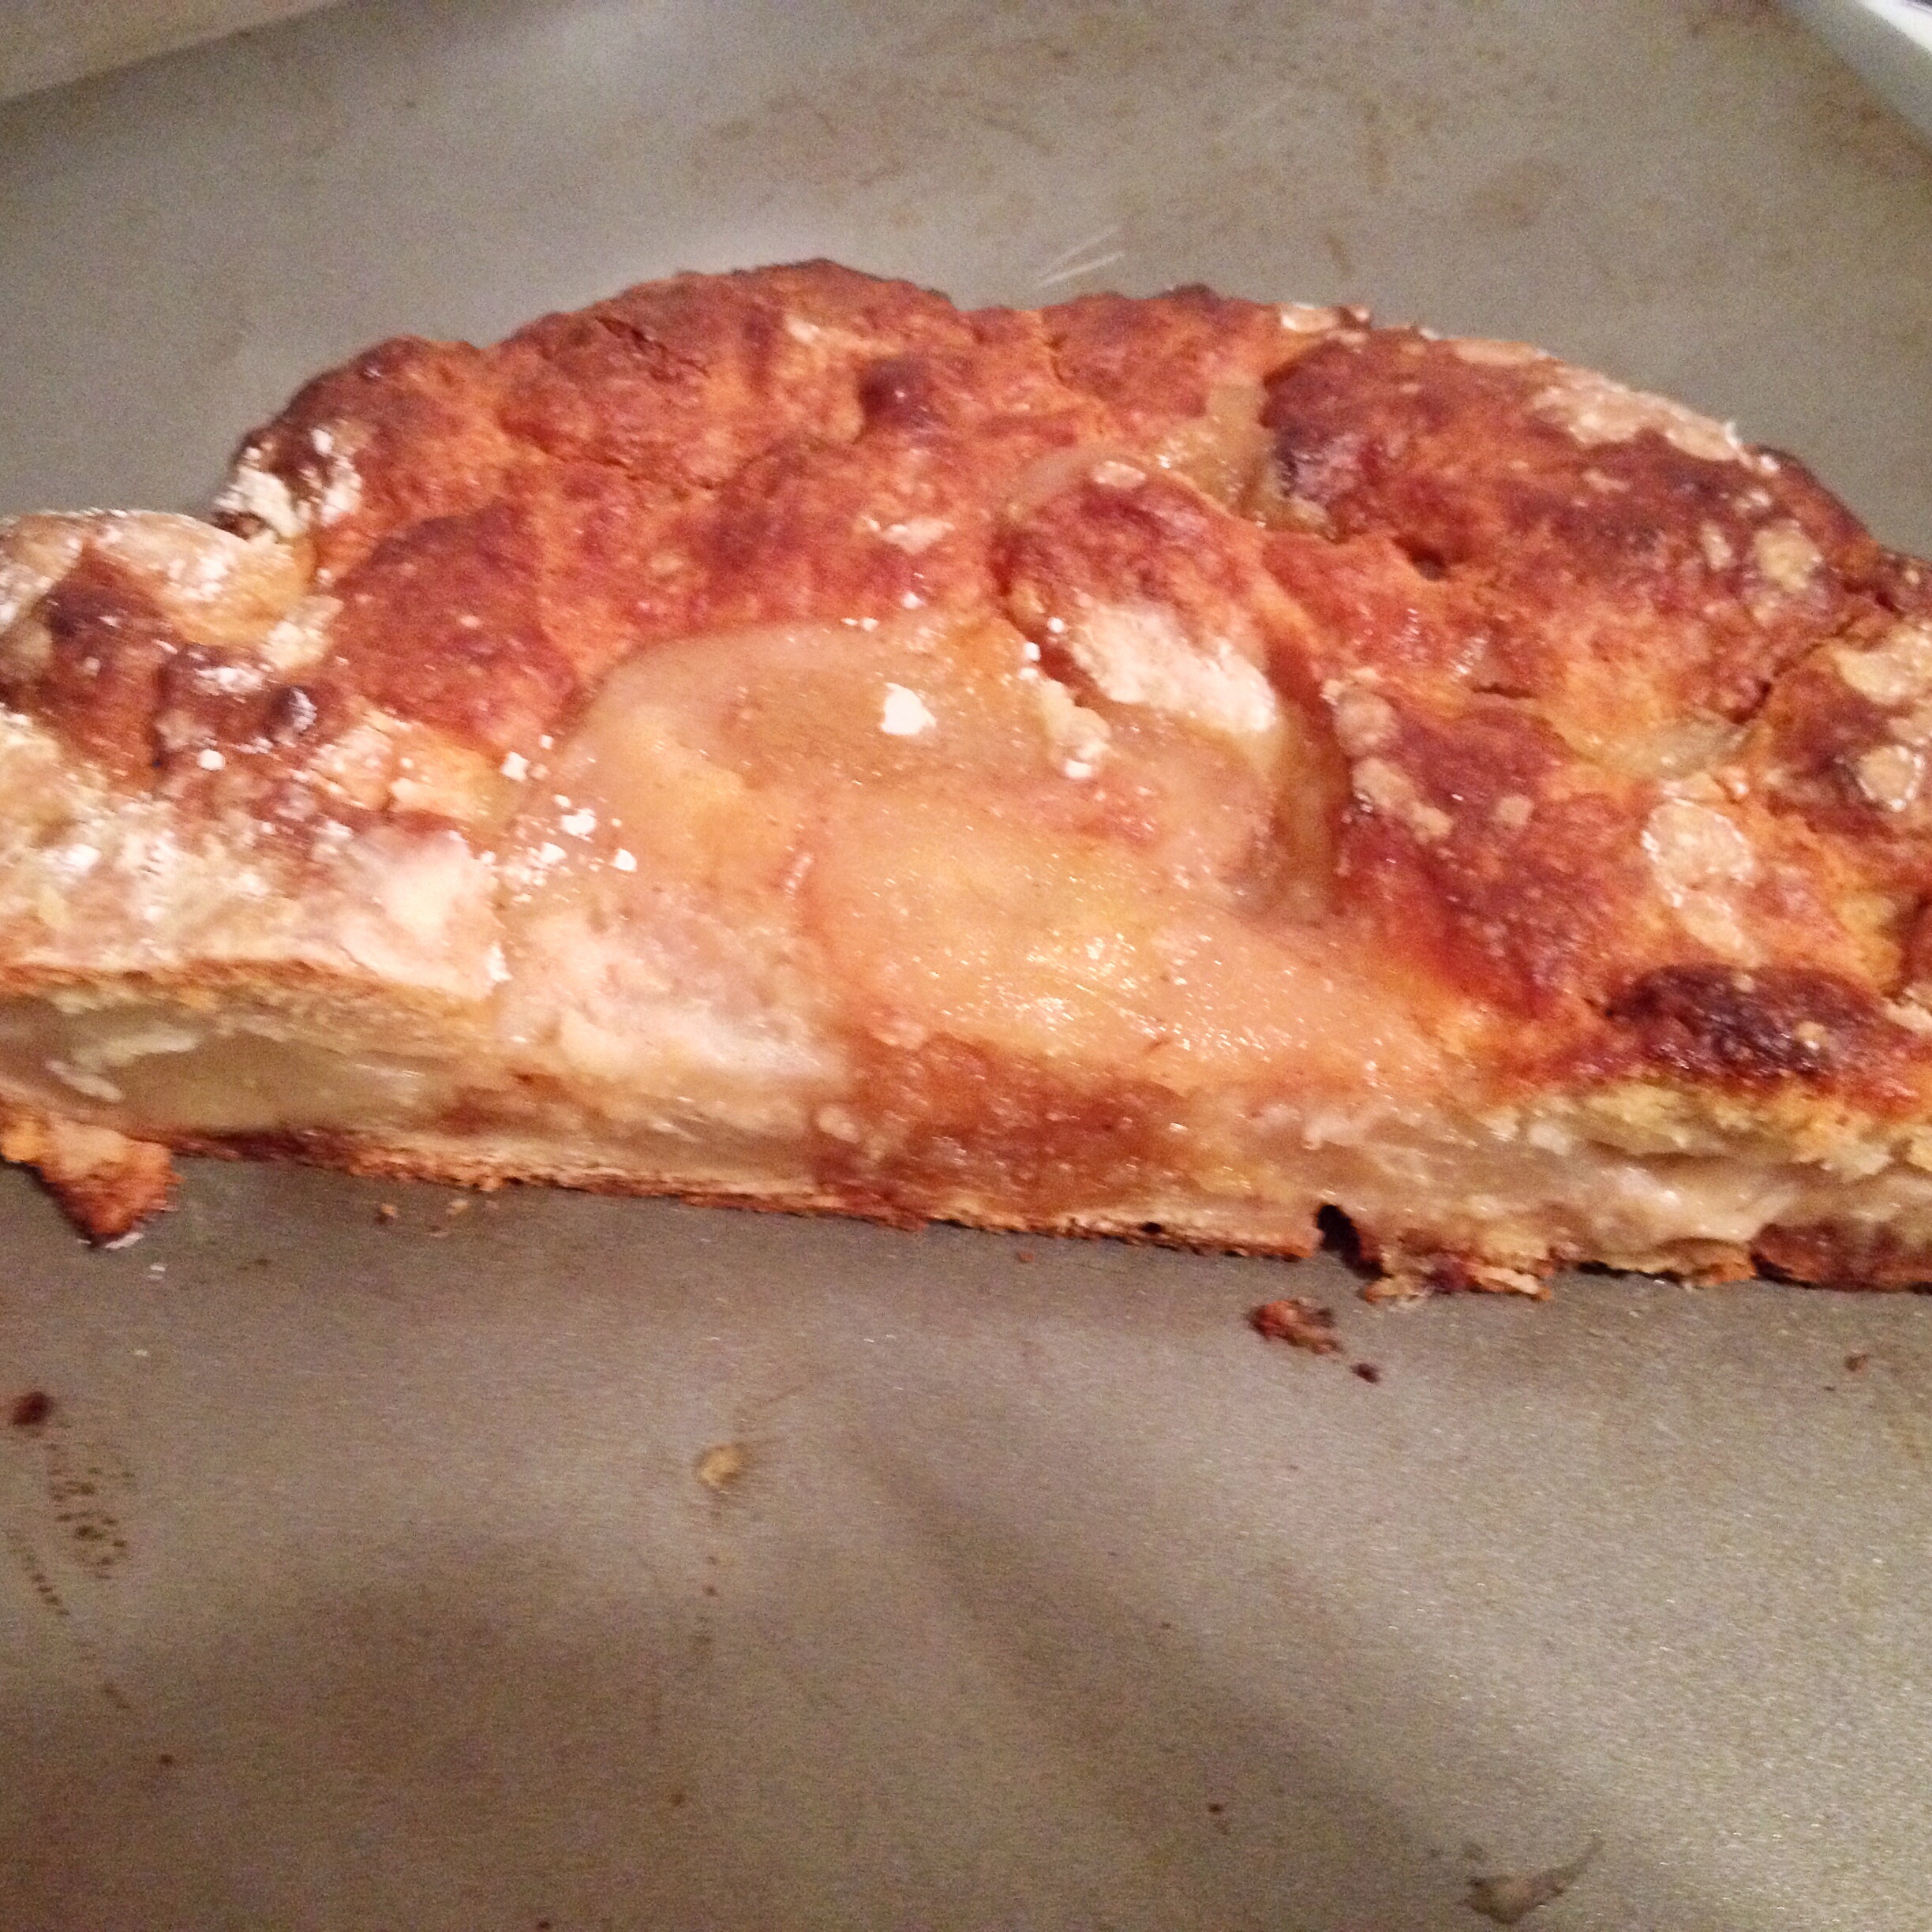
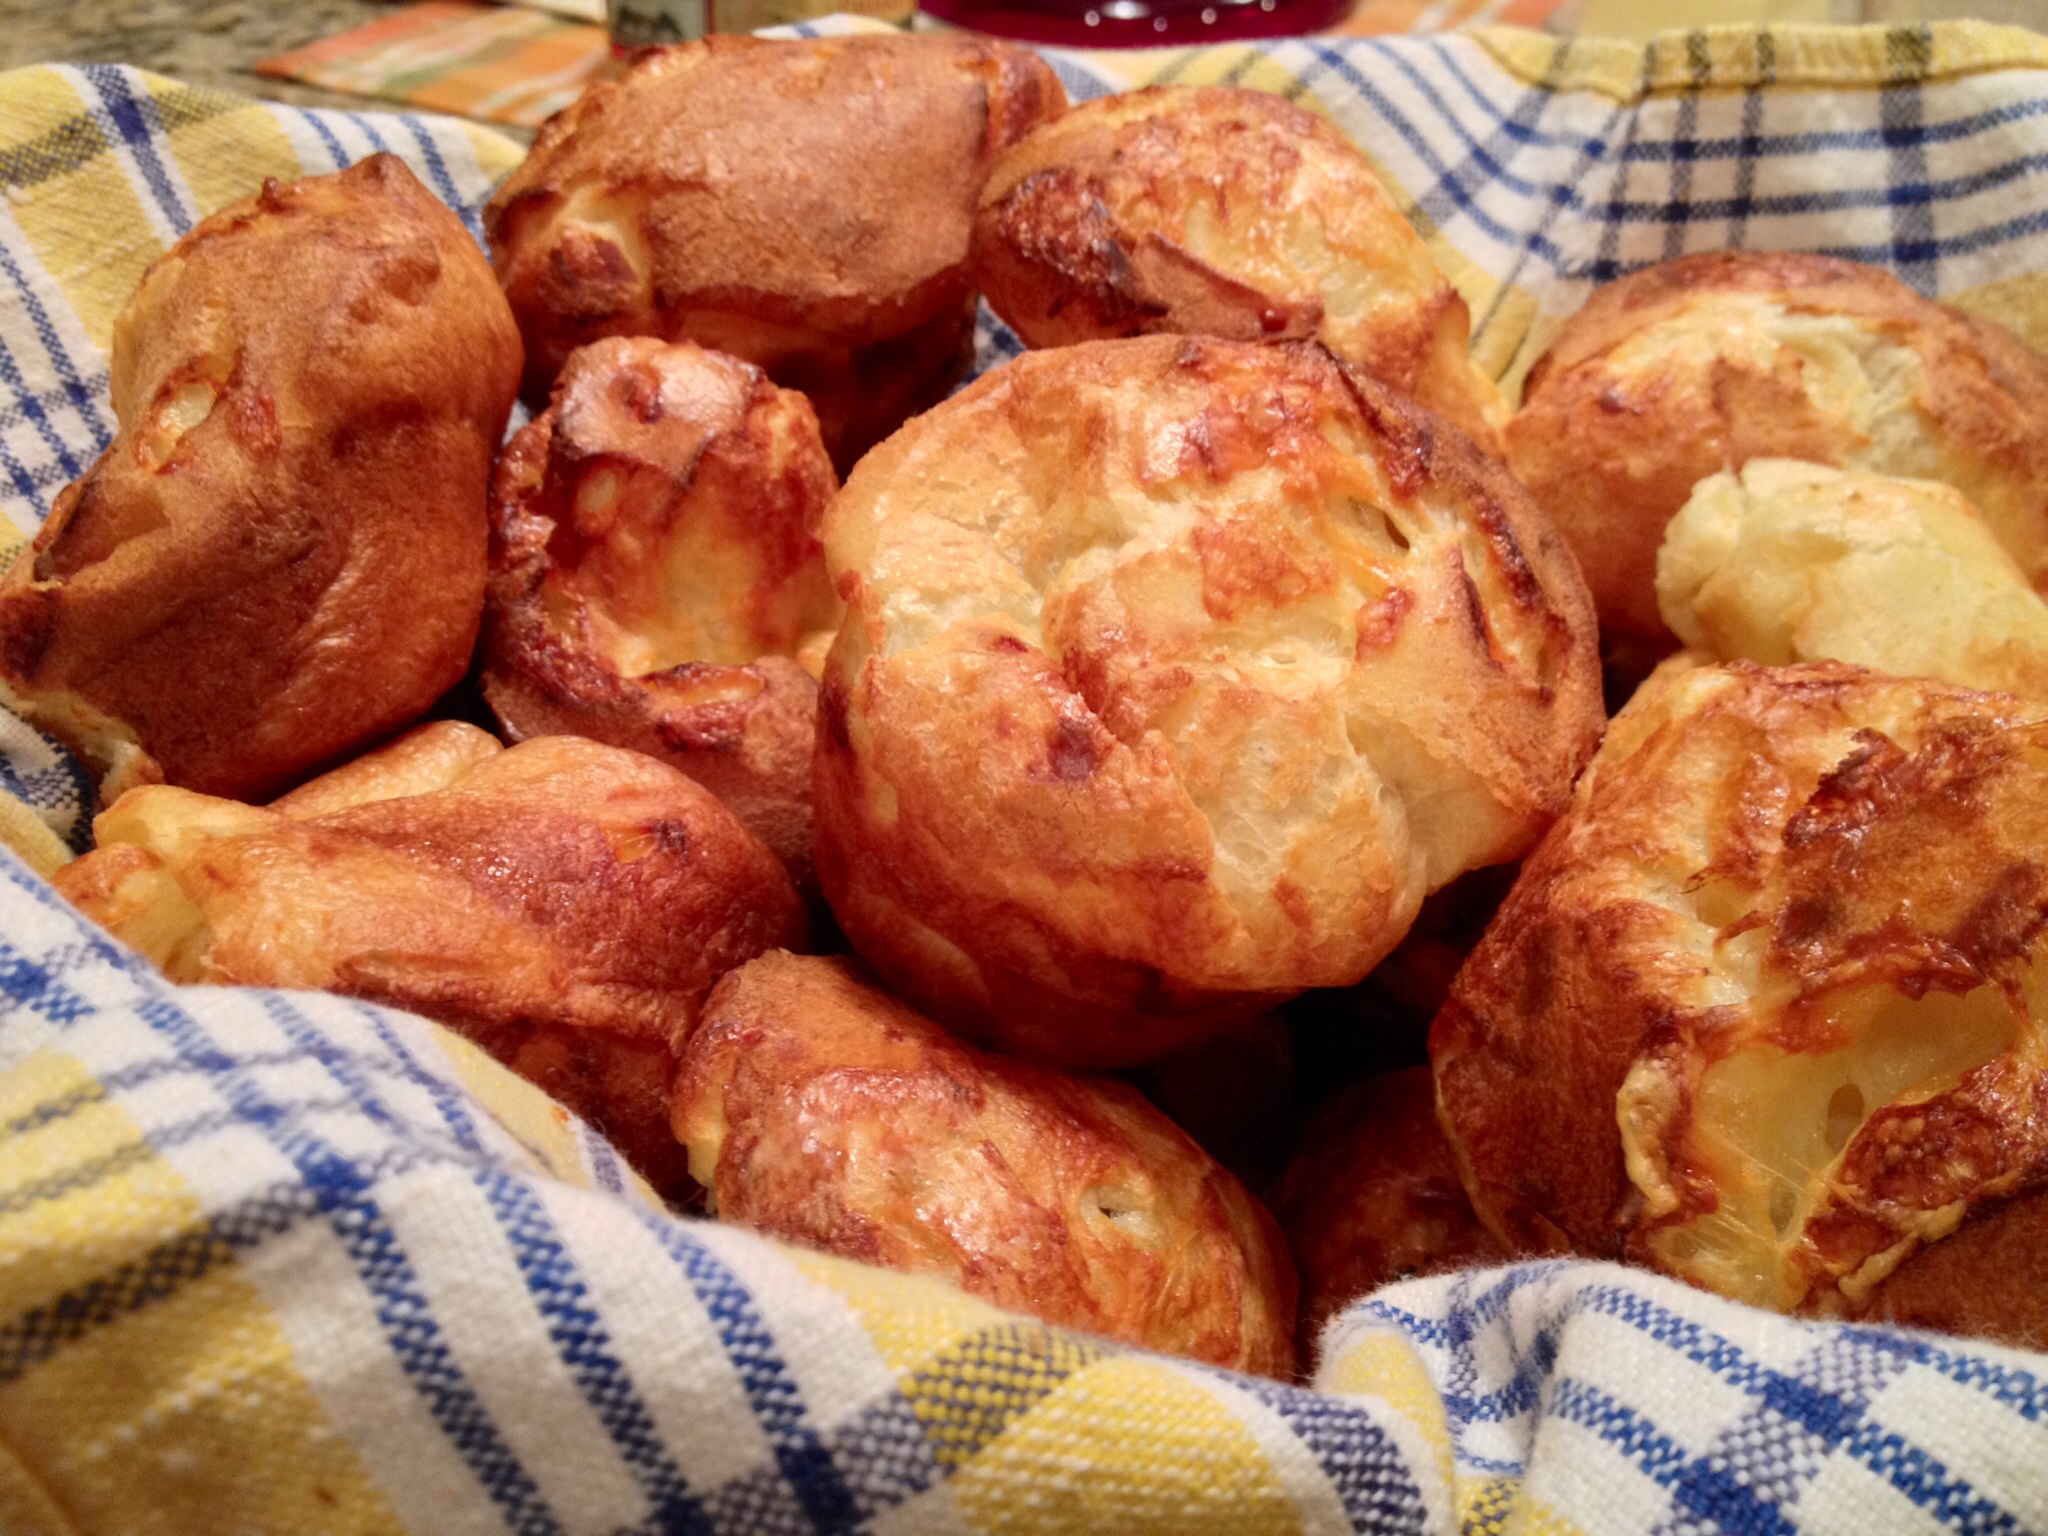
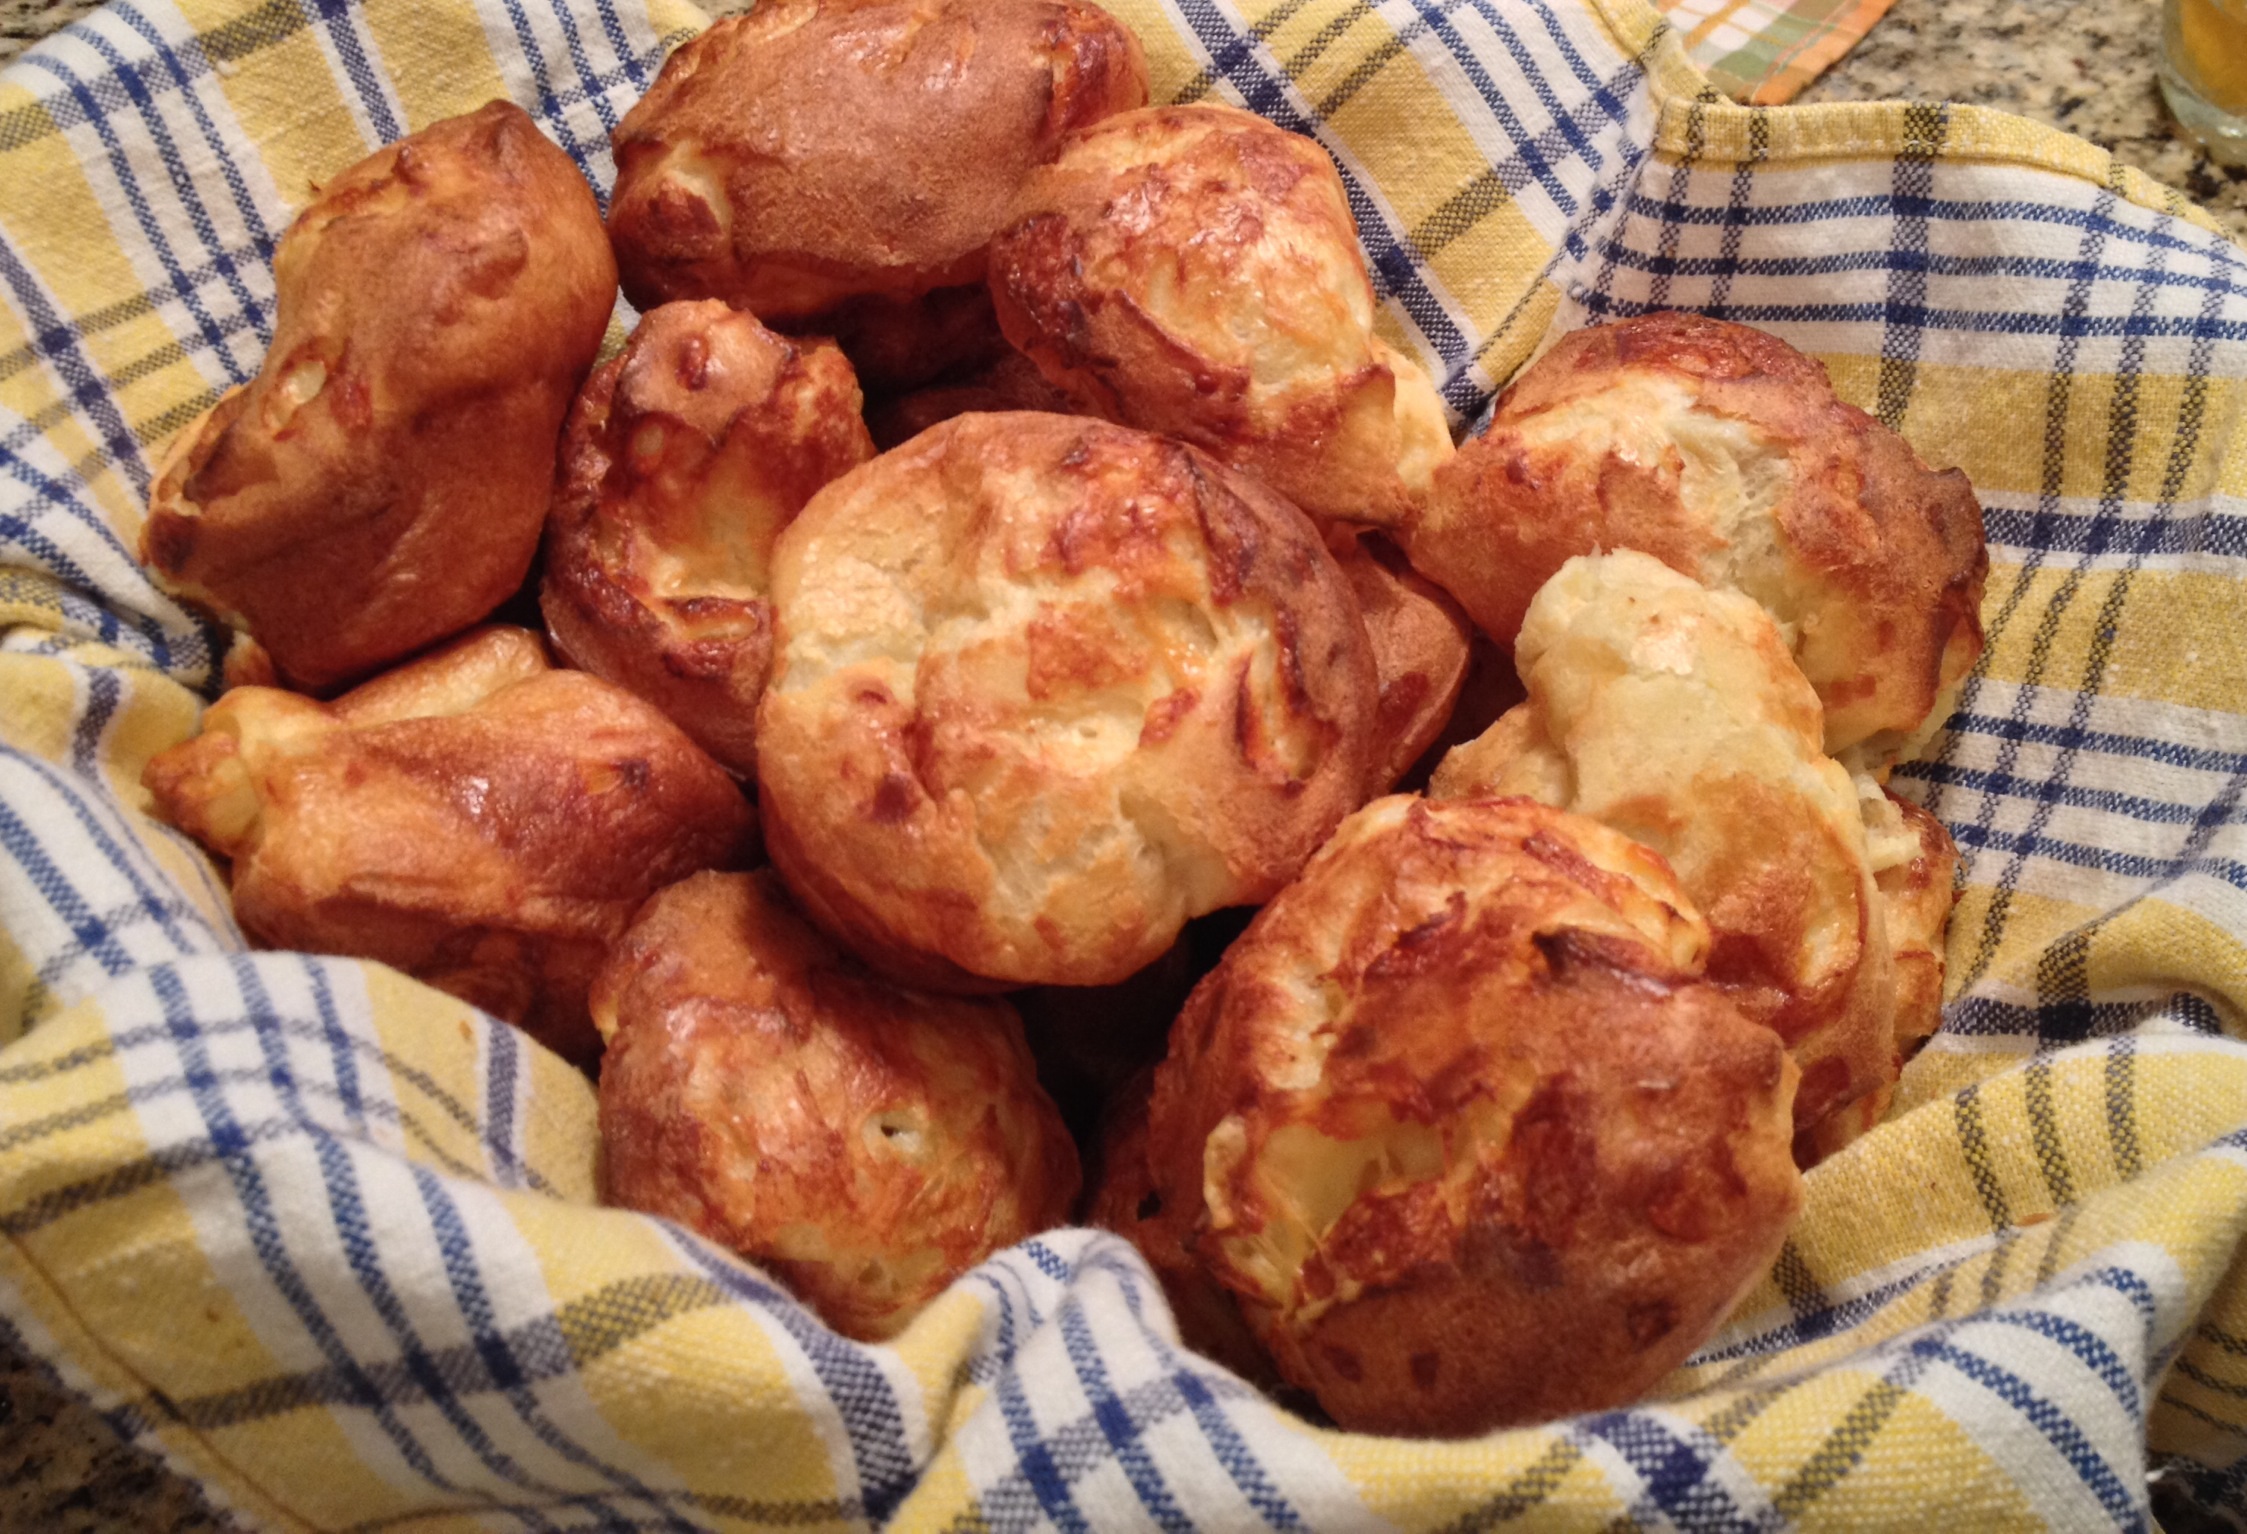
In T.W.O.’s family, we are always sharing new recipes and ideas, so we decided to post about the most recent inspiration from our sister-in-law (aka- our sister!). She invited us over for dinner and made Popovers that were delicious.  We loved the idea,  so put a spin on her popovers and added Gruyere cheese.  Check out how to make these fluffy, flakey, delectable treats!

 Thank you Becky for your inspiration!!! Xoxo

image

Ingredients:

– 3 cups milk, warmed
– 3 cups unbleached flour
– 6 eggs
– 2 cups Gruyere cheese, shredded

*Butter is optional for greasing the pan. T.W.O. used PAM instead.

image

Preheat oven to 400°F.  While the oven is preheating, place the muffin tins in the oven to warm.

In a bowl, beat the eggs until fluffy.  In a microwave safe bowl, heat the milk until the edges start to bubble.  If you have a thermometer, the milk should be about 125°F.  Slowly add the milk into the egg mixture making sure not to cook the eggs. Whisk together.  After the ingredients are mixed well, add the flour.

image

Remove the muffin pans from the oven and spray with baking oil.  Make sure you get the edges.  With a big spoon, pour the batter into each muffin tin, filling it about ¾ full.  Once you fill all the cups, place the muffin tin in the oven for 20 minutes.

image

After 20 minutes, reduce heat to 350°F and bake for another 10 minutes. Note – DO NOT open the oven.  This will let the heat out and your popovers won’t pop as well!  Use your oven light to check on the status of the delicious, airy treats! Also – placing the popovers on the middle rack helps circulate the air.

image

image

Here are a couple alternative ways to spice up your Popovers without the Gruyere cheese!

Cheddar Cheese Popovers:
– 2 cups cheddar cheese, shredded

Cinnamon & Sugar Popovers:
– 1 cup granulated sugar
– 2 Tablespoons vanilla
-1 Tablespoon cinnamon

Have a T.W.O.-Pop of a time baking!!!

T.W.O. signature

Chili – Cornbread

image

Fall is in full swing at T.W.O.’s house and that means cornbread and chili are on the menu.  Learn how to make a chili-cornbread that is a great addition to your chili  supper.

image

Ingredients:

– 2 boxes Jiffy Cornbread Mix
– 2 eggs
– 2/3 cup milk (T.W.O. used almond milk)
– 1 cup cheddar cheese, shredded
– 1 can cream of corn, 14.75 oz can
– 1 can diced Ortega chili, 7 oz can

Preheat oven to 400°.  In a bowl, mix cornbread mix, egg and milk until creamy.  Slowly add in ¾ cup cheese, cream of corn and Ortega chili.  Once mixed, pour batter into a greased 8.5 x 11 pyrex dish.  Sprinkle ¼ cup of cheese on  top of the cornbread before putting in the oven.

Cook for 20-25 minutes.  Once done, take the cornbread out and serve immediately.  Add some honey if desired and your chili night will be complete!  Later this week, T.W.O. will be featuring their chili recipe, so stay tuned!

image

Happy Baking!

T.W.O. signature

Roasted Butternut Squash with Swiss Chard

image

Picture this: A cold autumn’s night with green vegetables, toasted pine nuts, butternut squash and goat cheese. Sounds T.W.O. perfect, right? Well it is! Check out how to make this dish below.

image

Ingredients:

– 1 large butternut squash
– 2 large shallots, quartered
-4 gloves of garlic, skinned and halved
– 1 ½ Tablespoon cinnamon
– 1 ½ Tablespoon nutmeg
-1 large head Swiss chard, stems and leaves chopped separately
-¼ cup pine nuts, toasted
-¾ cups dried cranberries
– ¼ cup honey goat cheese, crumbled
– balsamic vinegar, to drizzle

Preheat oven to 375ᴼ. Peel the squash and cut in half lengthwise. Seed the squash and cut into bite-size cubes. Spray/brush the squash with olive oil and mix in cinnamon and nutmeg. Once the squash is coated, place on a baking sheet and cook for about 30-40 minutes until soft. Check the squash periodically and mix.

image

image

At the 20 minute mark, add the garlic and the shallots to the butternut squash on the baking pan in the oven.

While the squash medley is cooking, chop the Swish chard stems and sauté in a fry pan for 3 minutes with a drixzle of balsamic vinegar. After 2 minutes, add the Swish chard leaves.

image image

Mix in the cranberries and the roasted pine nuts.

image

Remove the squash, shallots and garlic from the oven and add to the Swish chard mixture. Once mixed, remove from stove and plate the ingredients. Add the goat cheese to the top for garnish. Serve immediately.

image

T.W.O. enjoys having this for leftovers for lunch the next day. Just heat it up in the microwave or on the stove and you will have another tasty meal!

Happy cooking!!!

T.W.O. signature

“Neutral Living” By T.W.O.

T.W.O.‘s Inspiration

001-lake-view-residence-staples-design-group(Copyright – Staples Design Group)

T.W.O.‘s Design Board

Neutral Living Room page1

(1) Pierce Sectional Sofa  (2) Gia Candle Holders, (3) Coffee Table
(4) Maulvrier Area Rug  (5) Morton Silver Serving Tray  (6) Stella Frames
(7) Lucianna Medallion Pillow

Neutral Living Room page2

(8) Metropolitan Console Table  (9) Bellesol Mirrors  (10) Pendant Clock
(11) Phalaenopsis Orchid  (12) Metropolitan Side Table (13) Blue Vase  (14) Palladian Table Lamp

T.W.O. used Houzz.com to search for their Neutral Living Space Board.

Happy Designing!!!

T.W.O. signature

Books T.W.O. Ways

bookshelves2

Decorating bookshelves is not easy. First you have to pick a theme, color scheme, and then purchase the items. When T.W.O. first was presented the task of decorating 2 sets of bookshelves, we did some research by looking through magazines and online. T.W.O fell in LOVE with the bookshelf design by Restoration Hardware (inspiration picture above). The design was rustic, but yet ‘beachy’, which was the theme that we were going for in the room. After studying the photo, T.W.O. decided that this would be a simple, less expensive project if we were to do it ourselves and not buy the pre-made book online. And that is what we did!

Supplies

Books (Paperback and hardcover)
Rotisserie string
Brown paper grocery bags
Scissors

image

To start the project, T.W.O. headed down to the nearest $1 bookstore. We scanned the books for size (both height and width), color of paper, titles, and condition. Once we gathered the amount needed, we headed home to begin working on the fun part!

First, remove all the book covers from the paperback books. These will be the books you bind together. Decide on the books you want to bind together- they can vary in size, color, etc. Once you have decided, cut your rotisserie string so that it is long enough to go around the books. Cut 2 stings for each “book stack” you make. Tie your books together, one string towards the top, then other towards the bottom. Repeat for the other “book stacks.”

image

image

For the hardback books, T.W.O. wrapped each book in a brown paper grocery bag. (Yes, it is like when you were in high school and had to wrap your textbooks. Hopefully you still have the skills to do it! ) Cut your paper bag so that it lays flat. Turn the paper over so that the blank side is face down. Now start folding! Once the book is covered, repeat for remaining hardback books.

image

image

image

Now it’s design time! Place the “book stacks” where you would like. T.W.O. incorporated seashells in glass containers on the bookshelves to tie in the “beachy” theme. Any theme can really work with these books- nautical, Spanish, Italian, aviation, etc. The choices are endless. Just remember- be creative and original. It’s easy as that!

T.W.O. signature